


 たか
たかはい、こんにちは。初めての「仕事の手帳」のカテゴリーはなんの記事にしようかな〜って考えていたら、ディレクトリ構造をスクショで載せるのが面倒なことに気づいた「にじいろのたか」です。
さて。
技術系のブログってよくディレクトリ構造のスクリーンショットを貼り付けてあると思うんですが、あれってものすごく面倒だったりしませんか?
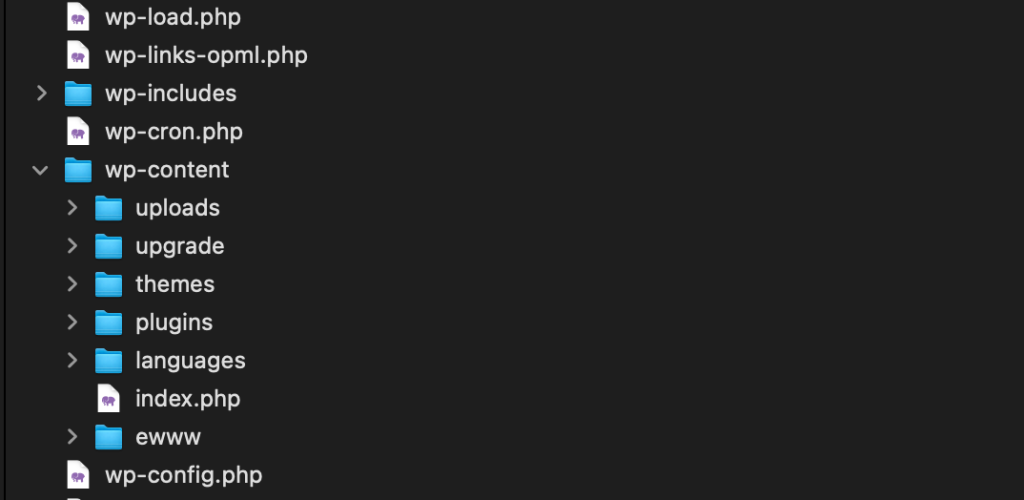
こういうやつです。
ディレクトリ構造って作業を進めていくとどんどん変化するから、その時にスクショを撮り忘れると最初の頃のディレクトリ構造のスクショを撮るのが大変なんですよね。作業を戻すのもバカバカしいし、ダミーのフォルダを作るのも大変だし。
というわけでブログ投稿の時にディレクトリ構造を簡単に表示できるスクリプトとCSSを作ってみました。
まずは完成形を見てください。
リストブロックの構造
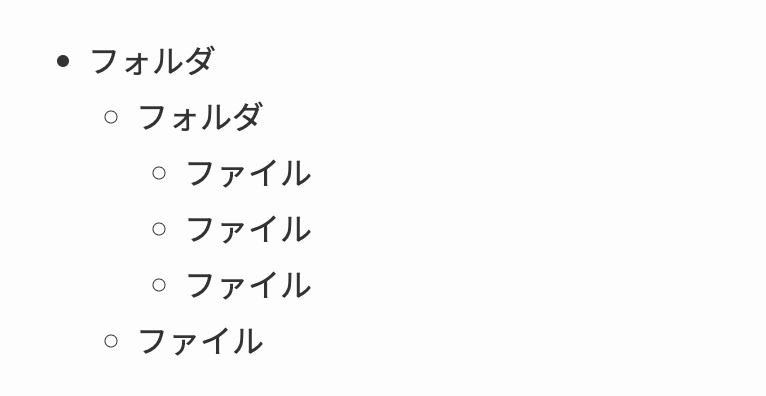
実際の表示
- フォルダ
- フォルダ
- ファイル
- ファイル
- ファイル
- ファイル
- フォルダ
リストブロックの階層構造を設定すると、ディレクトリ構造として表示してくれます。
JSとCSSを載せます
Javascript
document.addEventListener('DOMContentLoaded', () => {
    document.querySelectorAll('ul.directory-tree li').forEach(li => {
      const hasSubList = li.querySelector('ul');
      const manuallyMarked = li.classList.contains('folder');
      const textOnly = li.cloneNode(true);
      textOnly.querySelectorAll('ul').forEach(el => el.remove());
      const text = textOnly.textContent.trim();

      if (text === '') {
        li.remove();
        return;
      }

      li.classList.remove('folder', 'file', 'open', 'closed');

      if (manuallyMarked || hasSubList) {
        li.classList.add('folder');
        const subLis = li.querySelectorAll('ul > li');
        const hasVisibleChild = Array.from(subLis).some(childLi => {
          const childText = childLi.textContent.trim();
          return childText !== '';
        });
        li.classList.add(hasVisibleChild ? 'open' : 'closed');
      } else {
        li.classList.add('file');
      }
    });
  });
CSS
ul.directory-tree{
    padding: 1em 2em;
    background: rgba(255,255,255,0.25);
    border-radius: 0.5em;
}


ul.directory-tree,ul.directory-tree *{
    list-style: none;
    position: relative;

}

ul.directory-tree ul::after{
    content:'';
    height: calc(100% - 0.5em);
    width: 0.5em;
    position:absolute;
    border-left: 2px solid #AAA;
    border-bottom: 2px solid #AAA;
    top: 0;
    left: 0.5em;
    border-radius: 0 0 0 3px;
}

ul.directory-tree ul li{
    position: relative;
}

ul.directory-tree ul li:not(:last-child)::after {
    content:'';
    height: 0.5em;
    width: 0.5em;
    border-bottom: 2px solid #AAA;
    position:absolute;
    top: 0.5em;
    left: -1em;
}

ul.directory-tree > li::after{
    display: none;
}


ul.directory-tree li::before {
    font-family: "Font Awesome 6 Free";
    font-weight: 900;
    display: inline-block;
    margin-right: 0.5em;
  }

  ul.directory-tree li.folder::before {
    content: "\f07b";
    color: #4da6ff
  }

  ul.directory-tree li.folder.open::before {
    content: "\f07c";
    color: #4da6ff;
  }

  ul.directory-tree li.folder.closed::before {
    content: "\f07b";
    color: #4da6ff;
    opacity: 0.6;
  }

  ul.directory-tree li.file::before {
    content: "\f15b";
    color: #e5d5c3;
  }
どういう動きしてる?
ulとliについてJavascriptで構造を判別してクラス名を付加しています。
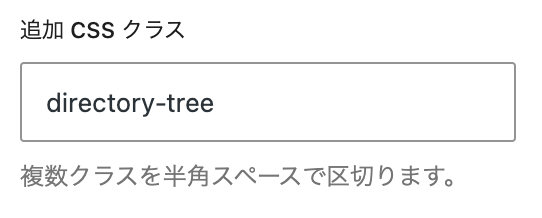
・親のulにクラス名「directory-tree」を付与するとJSで認識してくれます。
・ulを内包しているulはフォルダ判定
・何も入っていないulは削除
・liはファイル判定、ただし追加cssクラスでfolderを記述するとフォルダ判定
・上記の判定を行ったものに対してCSSでスタイリングをする
・内包しているフォルダは展開しているicon、中身非表示の時は閉じているicon
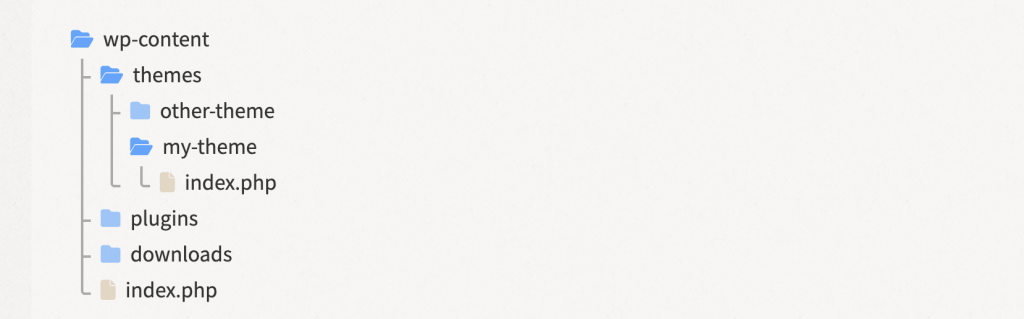
エラーがありました。
- wp-content
- themes
- other-theme
- my-theme
- index.php
- plugins
- downloads
- index.php
- themes
うーん、この構造だとディレクトリツリーの構造が崩れますね。修正が必要そうです。
エラー修正したので上記のディレクトリ構造は正しくなってしまいました。
崩れている時のスクリーンショットを掲載しておきます。
エラー修正:20250510
- wp-content
- themes
- other-theme
- my-theme
- index.php
- plugins
- downloads
- index.php
- themes
ulにクラス名「trim-line1」「trim-line2」などをつけることで対応しました。
本当はjsでクラス名を付けたかったですが・・・
ul.directory-tree{
    padding: 1em 2em;
    background: rgba(255,255,255,0.25);
    border-radius: 0.5em;
}


ul.directory-tree,ul.directory-tree *{
    list-style: none;
    position: relative;

}

ul.directory-tree ul::after{
    content:'';
    height: calc(100% - 0.5em);
    width: 0.5em;
    position:absolute;
    border-left: 2px solid #AAA;
    border-bottom: 2px solid #AAA;
    top: 0;
    left: 0.5em;
    border-radius: 0 0 0 3px;
}


ul.directory-tree ul.trim-line1::after{
    height: calc(100% - 0.5em - 1.86em) !important;
}
ul.directory-tree ul.trim-line2::after{
  height: calc(100% - 0.5em - 1.86em * 2) !important;
}
ul.directory-tree ul.trim-line3::after{
  height: calc(100% - 0.5em - 1.86em * 3) !important;
}
ul.directory-tree ul.trim-line4::after{
  height: calc(100% - 0.5em - 1.86em * 4) !important;
}
ul.directory-tree ul.trim-line5::after{
  height: calc(100% - 0.5em - 1.86em * 5) !important;
}
ul.directory-tree ul.trim-line6::after{
  height: calc(100% - 0.5em - 1.86em * 6) !important;
}
ul.directory-tree ul.trim-line7::after{
  height: calc(100% - 0.5em - 1.86em * 7) !important;
}
ul.directory-tree ul.trim-line8::after{
  height: calc(100% - 0.5em - 1.86em * 8) !important;
}
ul.directory-tree ul.trim-line9::after{
  height: calc(100% - 0.5em - 1.86em * 9) !important;
}

ul.directory-tree ul li{
    position: relative;
}

ul.directory-tree ul li:not(:last-child)::after {
    content:'';
    height: 0.5em;
    width: 0.5em;
    border-bottom: 2px solid #AAA;
    position:absolute;
    top: 0.5em;
    left: -1em;
}

ul.directory-tree > li::after{
    display: none;
}


ul.directory-tree li::before {
    font-family: "Font Awesome 6 Free";
    font-weight: 900;
    display: inline-block;
    margin-right: 0.5em;
  }

  ul.directory-tree li.folder::before {
    content: "\f07b";
    color: #4da6ff
  }

  ul.directory-tree li.folder.open::before {
    content: "\f07c";
    color: #4da6ff;
  }

  ul.directory-tree li.folder.closed::before {
    content: "\f07b";
    color: #4da6ff;
    opacity: 0.6;
  }

  ul.directory-tree li.file::before {
    content: "\f15b";
    color: #e5d5c3;
  }
プラグイン化しました。
たか作ったスクリプトとスタイルを WordPress プラグイン化しました。
このブログで使っているように、記事内にディレクトリ構造をきれいに表示したい方はぜひどうぞ。
コメント